Deep Learning is slowly becoming more integrated into society and many sectors are reaping its benefits and researchers are showing immense promise in advancing the technology. The following article aims to create a simple computer vision model to detect if people are wearing face masks or not. This solution can be beneficial in many settings including surveillance, it can also be deployed in lab settings to ensure safety and avoiding health hazards.
The deep learning framework used for this application is fastai which is a deep learning library built as a high-level API on top of the PyTorch framework. The images for the dataset are extracted using the library from an online search engine. The programme was coded and run using Kaggle’s cloud computing tool.
Full code available on Github.
Step 1: Importing Libraries and Data
First we are going to install the latest version of FastAI using a bash command.
#Check to see if Latest version of fastai is installed. Using pip install as it's a bash function
!pip install -Uqq fastai duckduckgo_search
Now we are going to import duckduckgo which is a search engine using fastai and we will create a function that extracts images with the given search words. the max_images parameter decides how many images to import for that particular search term. To minimise variance problem the dataset has been set to 80 images, more images can be added but 80 gives significant results with low variance.
#Using duckduckgo search engine for training set images
from duckduckgo_search import ddg_images
from fastcore.all import *

#Creating function to extract set number of images based on given keyword
def search_images(term, max_images=80):
    print(f"Searching for '{term}'")
    return L(ddg_images(term, max_results=max_images)).itemgot('image')
Now we will check if the images have been imported correctly by using the function to extract the URL of the image. We will also use a second function to save the image for testing purposes later on.
#extracting a sample image link
urls = search_images('portrait wearing face mask', max_images=1)
urls[0]

#using fastai to download the pic for later test usage
from fastdownload import download_url
test_img = 'wearing_mask.jpg'
download_url(urls[0], test_img, show_progress=False)

from fastai.vision.all import *
im = Image.open(test_img)
im.to_thumb(256,256)


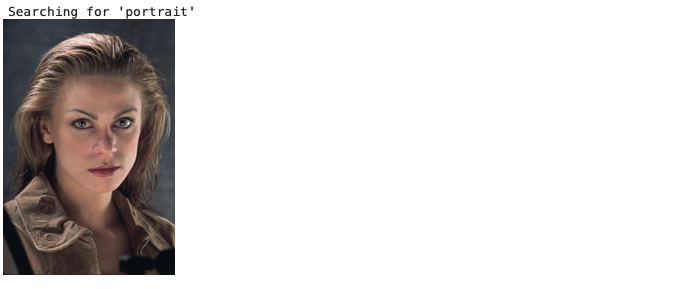
Now we will use the same process to get a sample image for category of people not wearing masks. A good search term would be “portrait” as it would return portraits of people which will obviously contain their facial features and hence will make a good model. For convenience we will also combine the two functions using above into one.
#previous functions merged into one
download_url(search_images('portrait', max_images=1)[0], 'test_img2.jpg', show_progress=False)
Image.open('test_img2.jpg').to_thumb(256,256)
We can notice that both the functions are working optimally. We will now use an iterative process of applying our initial function to download and build an entire training set using our search words. We will also use a for loop to add man and woman to our initial image search parameters to get a wider variety of data and to account for facial features like facial hair in order for our Network to learn those patterns.
#obtaining images
searches = 'portrait','portrait wearing face mask'
path = Path('mask_or_not')
from time import sleep

for o in searches:
    test_img = (path/o)
    test_img.mkdir(exist_ok=True, parents=True)
    download_images(test_img, urls=search_images(f'{o}'))
    sleep(5)  # Pause between searches to avoid over-loading server
    download_images(test_img, urls=search_images(f'{o} woman'))
    sleep(5)
    download_images(test_img, urls=search_images(f'{o} man'))
    sleep(5)
    resize_images(path/o, max_size=400, test_img=path/o)
Step 2: Training the Model
Now that our training set has been built. We are going to train our model. First we will use a function to remove failed imports. We will then use a built in fastai function which will automatically do data augmentation, labelling, cleaning and splitting for us based on the parameters we give. Our last step will then be to use the visual learner function to carry out transfer learning and already use a fastai pre-trained Neural Network for faster learning.
First we remove failed images with the following code:
#removing failed images
failed = verify_images(get_image_files(path))
failed.map(Path.unlink)
len(failed)
Now it’s time to use the data loader command to optimise our images. At the end we will also use a function to show a random batch to assess quality of the dataset that has been scrapped and to check if the labels are applied correctly.
dls = DataBlock(
    blocks=(ImageBlock, CategoryBlock),
    get_items=get_image_files,
    splitter=RandomSplitter(valid_pct=0.2, seed=42),
    get_y=parent_label,
    item_tfms=[Resize(192, method='squish')],
).dataloaders(path, bs=32)

dls.show_batch(max_n=6)

Now we will finally train the model using the vision_learner command to use transfer learning to import the pre-trained model, we are using resnet18 as it’s a good model with reasonable depth. We will judge our model by the function error_rate which is a built in fastai function
learn = vision_learner(dls, resnet18, metrics=error_rate)
learn.fine_tune(3)
Using this function we can notice a very low error rate and low variance shown by train loss and validation loss.We were able to train our model to a reasonable accuracy using 3 epoch’s. We were also able to train the model in less than 4 minutes using Kaggle’s built in Accelerator GPU T4x2.
Step 3 : Testing
Now it’s finally time to test our model. We will use different type of images to assess the performance our model and to see if it predicts wearing a mask or not wearing a mask on challenging new images.
Image 1 : Image we first imported at the start
wearing_mask,_,probs = learn.predict(PILImage.create('wearing_mask.jpg'))
print(f"This person is: {wearing_mask}.")
print(f"Probability This Person is wearing a mask: {1-probs[0]:.4f}")

Here we have got a promising result. Our model predicts 1.0 as the probability of wearing a mask. Let’s try on some new images using duckduckgo.
Image 2 : Person with hoodie and weird angle to test our model.
#downloading the image
download_url(search_images('Person with hoodie portrait', max_images=1)[0], 'final_test1.jpg', show_progress=False)
Image.open('final_test1.jpg').to_thumb(256,256)

#prediction given by model(run code in different cell)
wearing_mask,_,probs = learn.predict(PILImage.create('final_test1.jpg'))
print(f"This person is: {wearing_mask}.")
print(f"Probability This Person is wearing a mask: {1-probs[0]:.4f}")
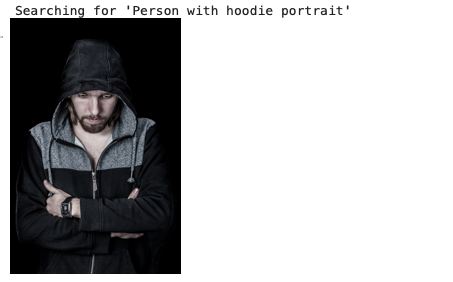

Our model has correctly predicted this person as just a portrait. It has only allowed a 25% probability of the person wearing a mask.
Image 3 : Person with a side angle click and a unique reflective mask
download_url(search_images('face mask side', max_images=1)[0], 'final_test2.jpg', show_progress=False)
Image.open('final_test1.jpg').to_thumb(256,256)

wearing_mask,_,probs = learn.predict(PILImage.create('final_test2.jpg'))
print(f"This person is: {wearing_mask}.")
print(f"Probability This Person is wearing a mask: {1-probs[0]:.4f}")


Our model showed stunning results and allotted a 99.95% probability of this person wearing a mask.
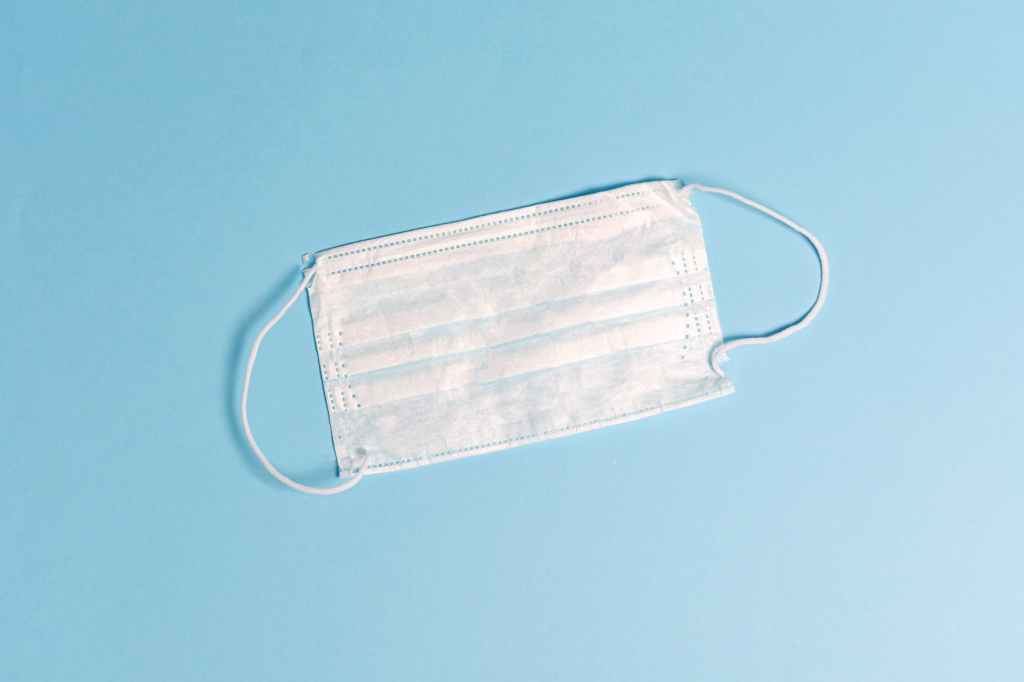
Image 4 : Person with a white face mask
download_url(search_images(' white  face mask ', max_images=1)[0], 'final_test3.jpg', show_progress=False)
Image.open('final_test3.jpg').to_thumb(256,256)

wearing_mask,_,probs = learn.predict(PILImage.create('final_test3.jpg'))
print(f"This person is: {wearing_mask}.")
print(f"Probability This Person is wearing a mask: {1-probs[0]:.4f}")
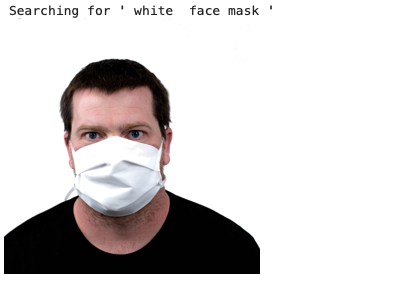

Great results once again !
Image 5: Person with dense facial hair
download_url(search_images('guy with big beard ', max_images=1)[0], 'final_test.jpg', show_progress=False)
Image.open('final_test.jpg').to_thumb(256,256)

wearing_mask,_,probs = learn.predict(PILImage.create('final_test.jpg'))
print(f"This person is: {wearing_mask}.")
print(f"Probability This Person is wearing a mask: {1-probs[0]:.4f}")


Our model was able to correctly classify despite this being a tricky image!

Leave a comment